> ## Documentation Index
> Fetch the complete documentation index at: https://docs.bult.ai/llms.txt
> Use this file to discover all available pages before exploring further.
# RAG template project
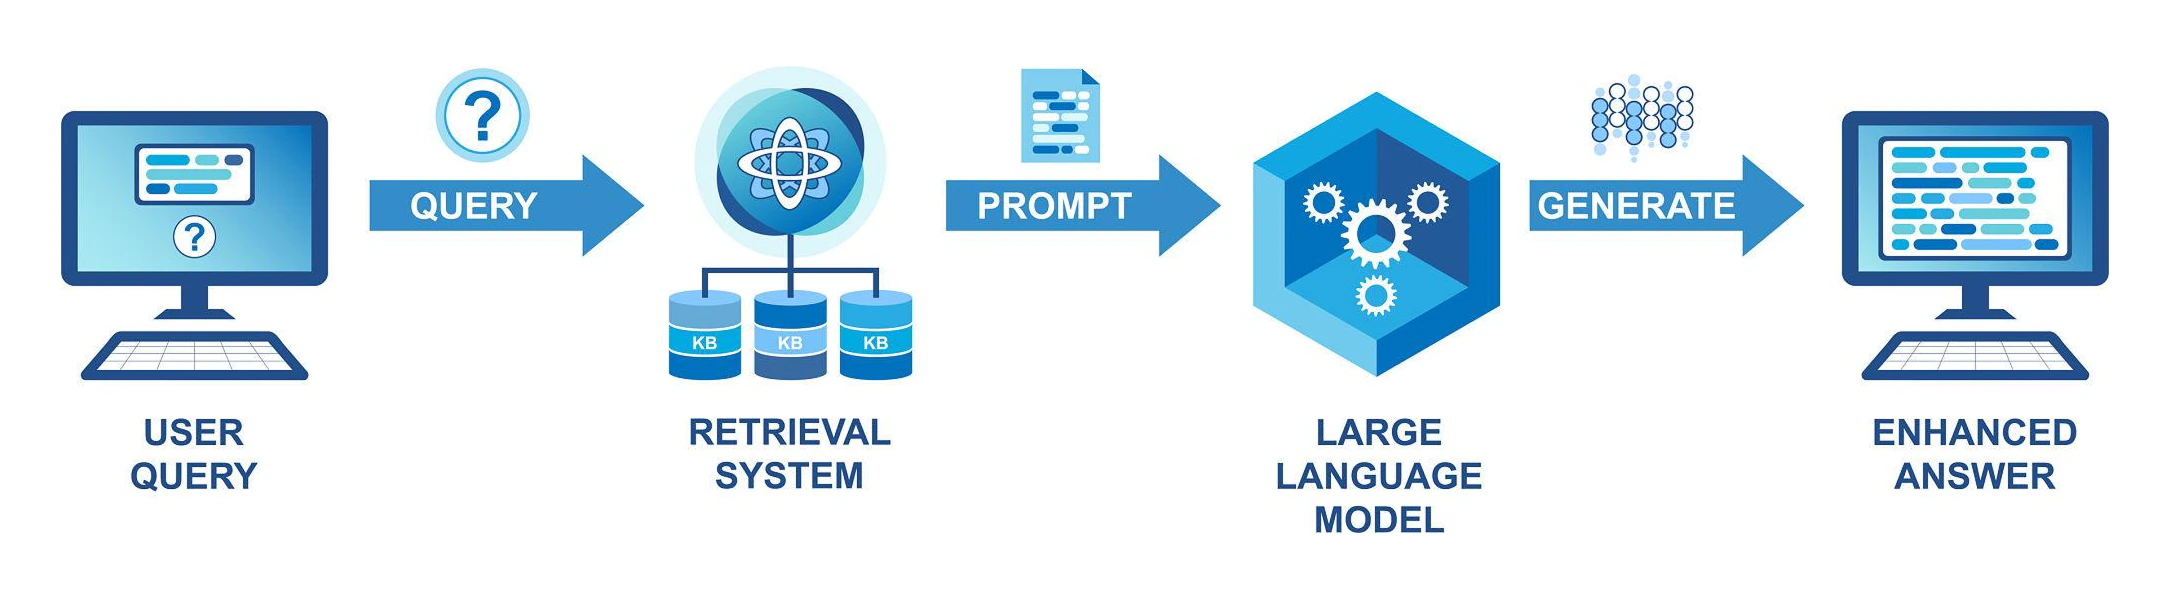
### Overview
Deploy a production ready Retrieval Augmented Generation (RAG) system in minutes.
Full step-by-step video tutorial is here: [https://youtu.be/CkcVGtiSGDQ?si=Y1X1LP-Aw09g\_zIp](https://youtu.be/CkcVGtiSGDQ?si=Y1X1LP-Aw09g_zIp)
**GitHub repo**: [https://github.com/bultcloud/RAG-BultAI](https://github.com/bultcloud/RAG-BultAI)
Upload documents. Ask questions. Get answers with inline citations and source scoring.
This template includes:
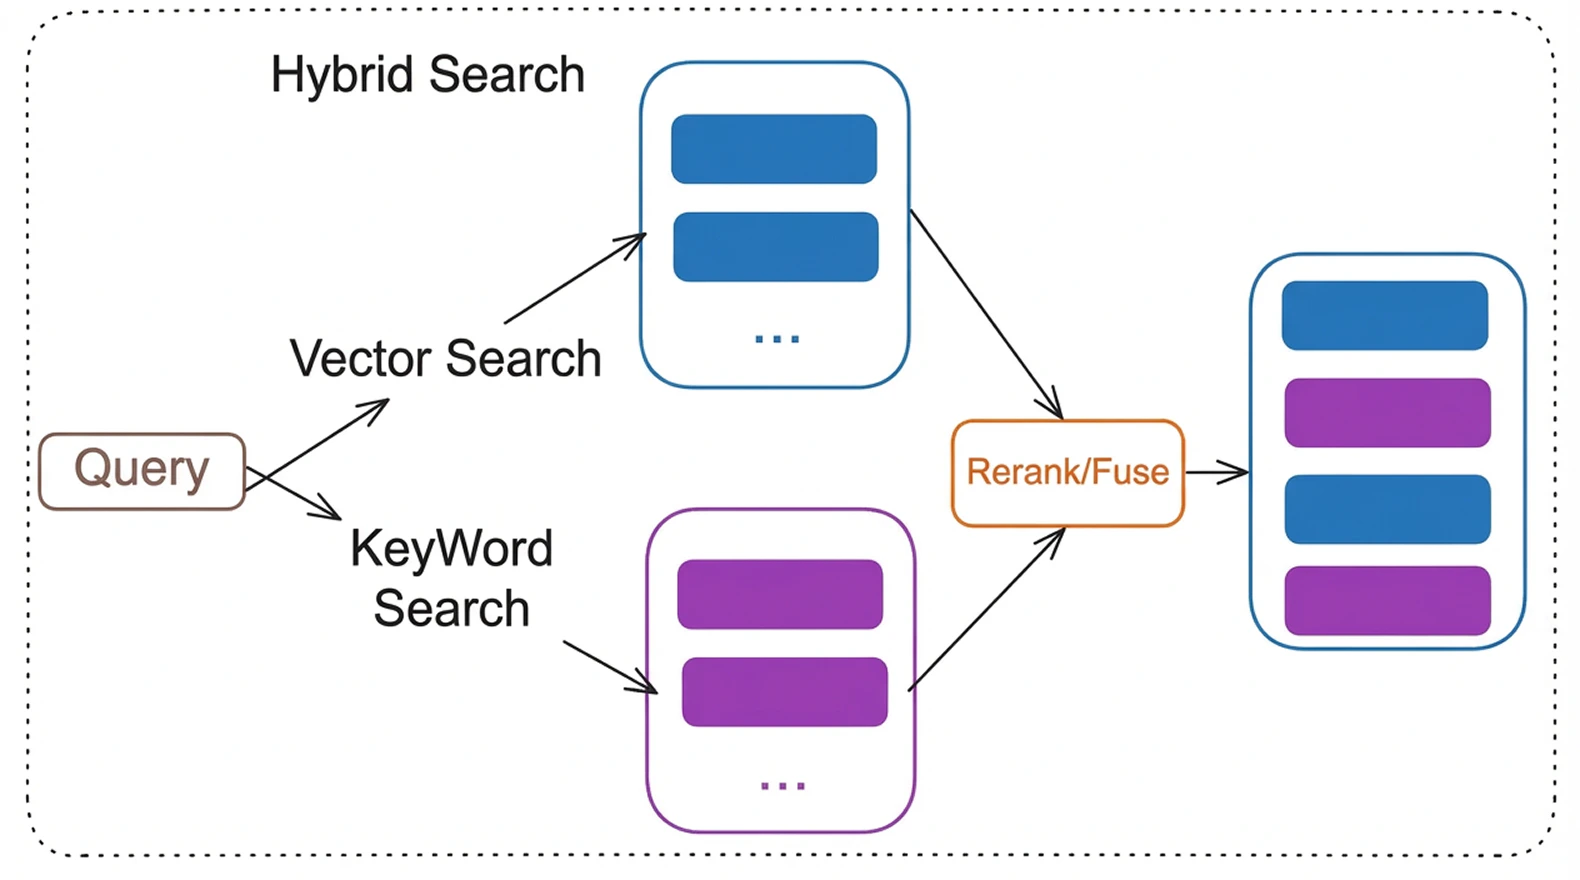
• Hybrid search combining keyword and vector retrieval\
• Cross encoder reranking for higher precision\
• Multi model LLM support\
• Background document processing\
• Authentication and analytics
It supports multiple LLM providers (OpenAI, Anthropic, Google, Ollama), hybrid search with reranking, OCR for scanned PDFs, multi-user authentication, and conversation export.
It is designed to demonstrate how to run serious AI workloads on [Bult.ai](https://bult.ai/) without managing infrastructure.
***
### Architecture
\#1
\#2
***
### Components
\
**App Service**\
FastAPI backend handling authentication, API endpoints, streaming responses.
**PostgreSQL**\
Stores users, projects, documents, analytics.
**pgvector**\
Stores embeddings and enables vector similarity search.
**Background Worker**\
Processes documents asynchronously:\
• Chunking\
• Embedding generation\
• OCR if needed
**LLM Provider**\
OpenAI, Anthropic, Google, or Ollama.
***
### Features
* Multi-model LLM support -- switch between OpenAI, Anthropic, Google AI, or local Ollama models via environment variable
* Advanced RAG pipeline -- hybrid search (BM25 + vector), cross-encoder reranking, HyDE query transformation, multi-query retrieval, query decomposition
* Document processing -- PDF, DOCX, PPTX, TXT, MD, CSV, JSON, HTML; automatic OCR for scanned PDFs via Tesseract
* Inline citations -- every response cites source documents with relevance scores
* Authentication -- JWT login/register + optional Google OAuth
* Analytics dashboard -- usage metrics, cost tracking, query latency, top projects
* Conversation export -- Markdown, JSON, and PDF export with full Unicode support
* Background processing -- async job queue with progress tracking and retry logic
* Single-page frontend -- clean UI with streaming responses, markdown rendering, dark mode
***
### Deploy RAG on bult.ai
[Bult.ai](https://bult.ai/) is a PaaS that deploys from GitHub with built-in database templates and Docker support.
You need three services: the app (GitHub), a PostgreSQL database, and a pgvector instance.
#### Prerequisites
* GitHub account
* OpenAI API key (get one here)
* [Bult.ai](https://bult.ai/) account
#### Step 1: Fork or clone this repository
Fork this repo on GitHub (or clone it and push to your own repo).
**GitHub repo**: [https://github.com/bultcloud/RAG-BultAI](https://github.com/bultcloud/RAG-BultAI)
#### Step 2: Create the app service (GitHub)
1. On bult.ai, click Create > GitHub
2. Select your forked repository
3. Go to the Git tab and change build settings from Nixpacks to Dockerfile. Set Dockerfile Path to Dockerfile and Dockerfile Context to "."
4. Inside the service settings, set the port to 8002
5. Go to Environment Variables and add the variables from .env.example.
The required ones:
| Variable | Value |
| ---------------- | ----------------------------------------------------------------------------------------- |
| PG\_CONN | postgresql://YOUR\_USER:YOUR\_PASSWORD @pgvector:5432/YOUR\_DB |
| OPENAI\_API\_KEY | Your OpenAI API key |
| JWT\_SECRET | A random string (generate: python -c "import secrets; print(secrets.token\_urlsafe(32))") |
Add any other settings from .env.example as needed (LLM\_MODEL, EMBEDDING\_MODEL, etc.).
Note: The PG\_CONN hostname must match the name of your pgvector Docker service (step 4).
Set the user, password, and database name to match your Postgres service (step 3).
#### Step 3: Create the PostgreSQL database
1. Click Create > in the list of services, go to Databases > Postgres
2. This creates a Postgres instance from a built-in template -- it's automated
3. The only thing you need to configure is the environment variables:
| Variable | Value |
| ------------------ | --------------------------------------- |
| POSTGRES\_USER | Your database username (e.g., pgvector) |
| POSTGRES\_PASSWORD | A strong password |
| POSTGRES\_DB | Your database name (e.g., ragdb) |
These values must match what you put in PG\_CONN in step 2.
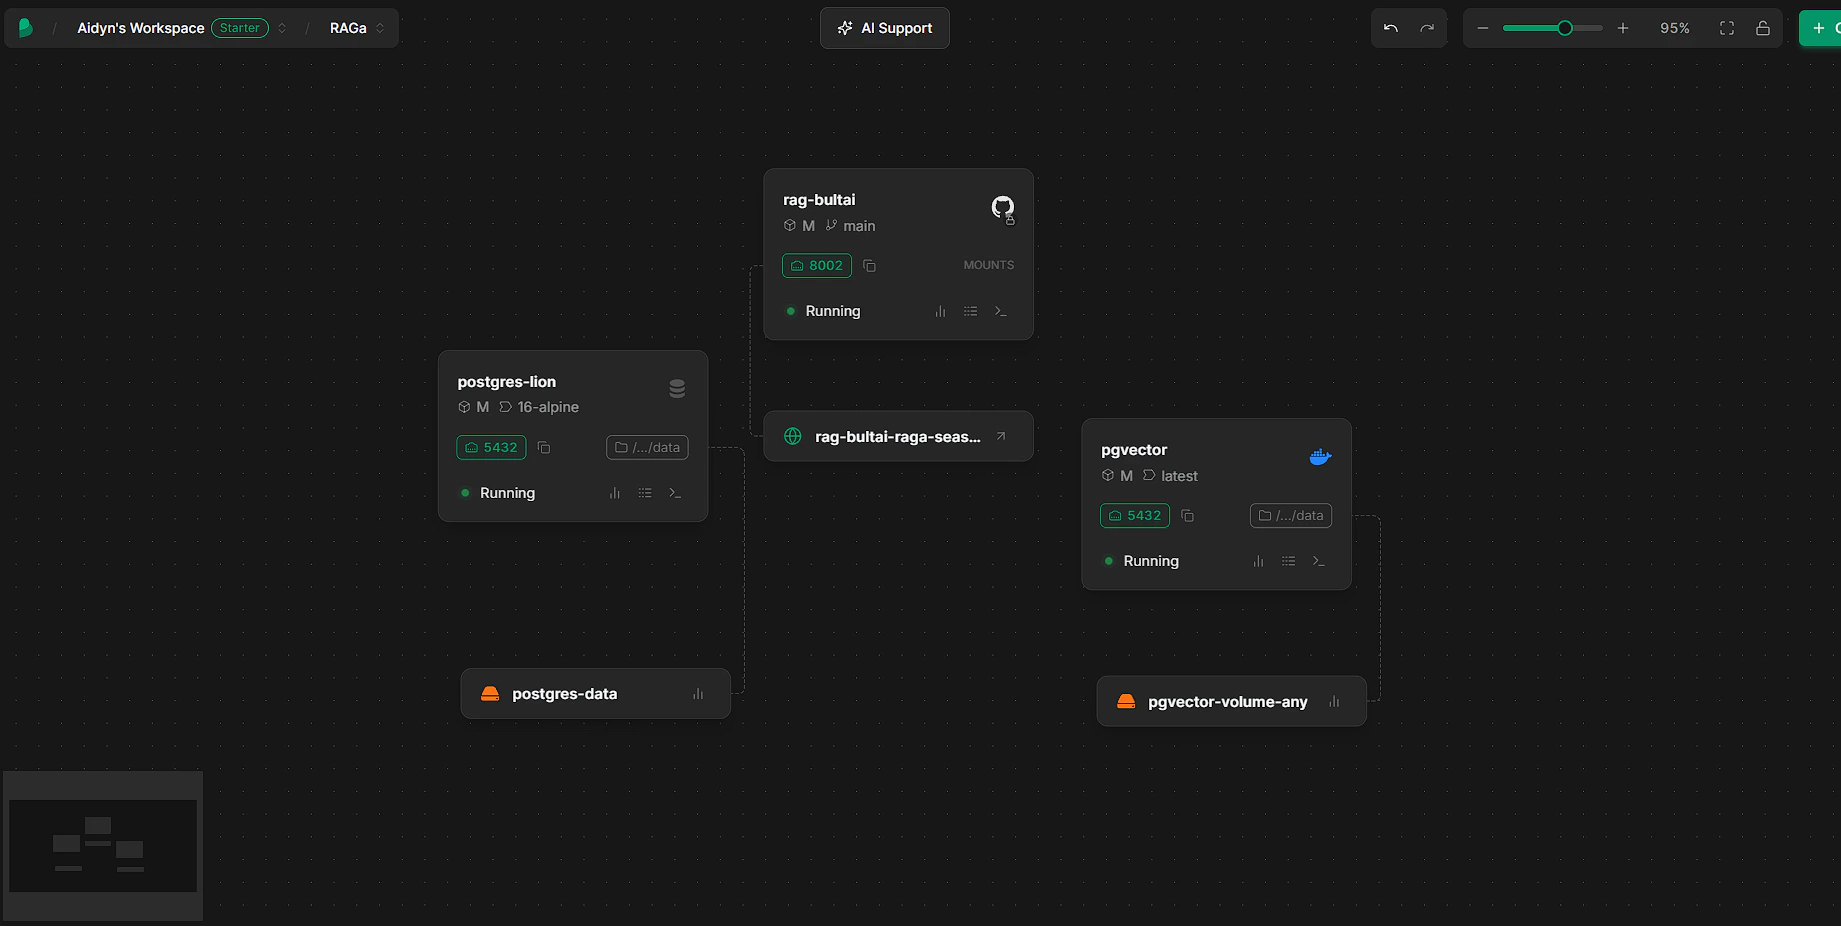
#### Step 4: Create the pgvector service (Docker)
The app needs the pgvector extension for vector search. Create a Docker service for it:
1. Click Create > Docker
2. Docker image: ankane/pgvector:latest
3. Name this service to match the hostname in your PG\_CONN (e.g., pgvector)
4. Deploy the service
5. After it's running, add a volume mounted at /var/lib/postgresql/data for persistent storage
6. Add internal port 5432
#### Step 5: Deploy and verify
1. All three services should show as running
2. Check the app service logs -- you should see database migrations and the worker starting
3. Open the public URL for your app service. Register a user and start chatting.
#### Troubleshooting
| Problem | Fix |
| --------------------------- | --------------------------------------------------------------------------------------------------------------------------------------------------- |
| Database connection error | Verify PG\_CONN hostname matches your pgvector service name. Check that POSTGRES\_USER, POSTGRES\_PASSWORD, and POSTGRES\_DB match across services. |
| Documents stuck in "queued" | Check app logs for errors. Verify OPENAI\_API\_KEY is set correctly. |
| OCR not working | Nixpacks installs Tesseract automatically from nixpacks.toml. Check build logs. |
| Build fails | Make sure your fork is up to date. Check build logs on bult.ai. |
#### Optional: Google Sign-In
To enable Google OAuth login:
1. Go to Google Cloud Console and create a project (or use an existing one)
2. Navigate to APIs & Services > OAuth Consent Screen and configure it
3. Go to Credentials > Create OAuth Client ID > Web Application
4. Under Authorized redirect URIs, add your bult.ai callback URL. The format is:
```text theme={null}
https://..bult.app/api/auth/google/callback
```
For example: [https://rag-bultai-raga-season.fin1.bult.app/api/auth/google/callback](https://rag-bultai-raga-season.fin1.bult.app/api/auth/google/callback)
Important: The redirect URI in Google Cloud Console must exactly match your app's public URL on bult.ai. You can find this URL in your app service settings on the bult.ai dashboard.
5. Copy the Client ID and Client Secret, then add these environment variables to your app service:
| Variable | Value |
| ---------------------- | -------------------------------------------------------------------- |
| GOOGLE\_CLIENT\_ID | Your OAuth client ID |
| GOOGLE\_CLIENT\_SECRET | Your OAuth client secret |
| OAUTH\_REDIRECT\_URI | https\://\.\.bult.app/api/auth/google/callback |
6. Redeploy. The login page will show a "Sign in with Google" button.
***
### Local Development
#### Prerequisites
* Python 3.10+
* PostgreSQL 14+ with pgvector extension
* OpenAI API key
#### Setup
```text theme={null}
# Clone your fork
git clone https://github.com/YOUR_USERNAME/rag-template-multimodel.git
cd rag-template-multimodel
# Create virtual environment
python -m venv venv
source venv/bin/activate # Windows: .\venv\Scripts\activate
# Install dependencies
pip install -r requirements.txt
# Set up database
createdb ragdb
psql -d ragdb -c "CREATE EXTENSION IF NOT EXISTS vector;"
# Schema is created automatically on first app startup
# Configure environment
cp .env.example .env
# Edit .env -- set OPENAI_API_KEY and PG_CONN at minimum
# Run
python app.py
```
A background worker starts automatically with the app. To run additional workers for faster document processing, open a separate terminal:
```text theme={null}
python core/worker.py
```
Open [http://localhost:8002](http://localhost:8002). Register a user and start uploading documents.
***
### How It Works
#### Document processing pipeline
1. User uploads a file through the web UI
2. A background job is created (status: queued)
3. The worker picks up the job and processes the document:
* Loads the file with PyMuPDF (PDFs) or LlamaIndex readers (other formats)
* Detects if the PDF has a text layer -- if not, runs OCR (Tesseract)
* Optionally extracts tables with pdfplumber
* Splits text into chunks (semantic or fixed-size, configurable)
* Generates embeddings via OpenAI API
* Stores chunks + embeddings in PostgreSQL with pgvector
4. Document status updates in real time: queued > processing > ready
#### Query pipeline
1. User asks a question in a conversation
2. The query goes through optional transformations: HyDE, multi-query expansion, decomposition
3. Hybrid search combines BM25 keyword matching + vector similarity (configurable alpha balance)
4. Cross-encoder reranks the top candidates for precision
5. Top chunks are sent to the LLM with a system prompt that enforces inline citations
6. Response streams back to the UI character by character
Uploading files:
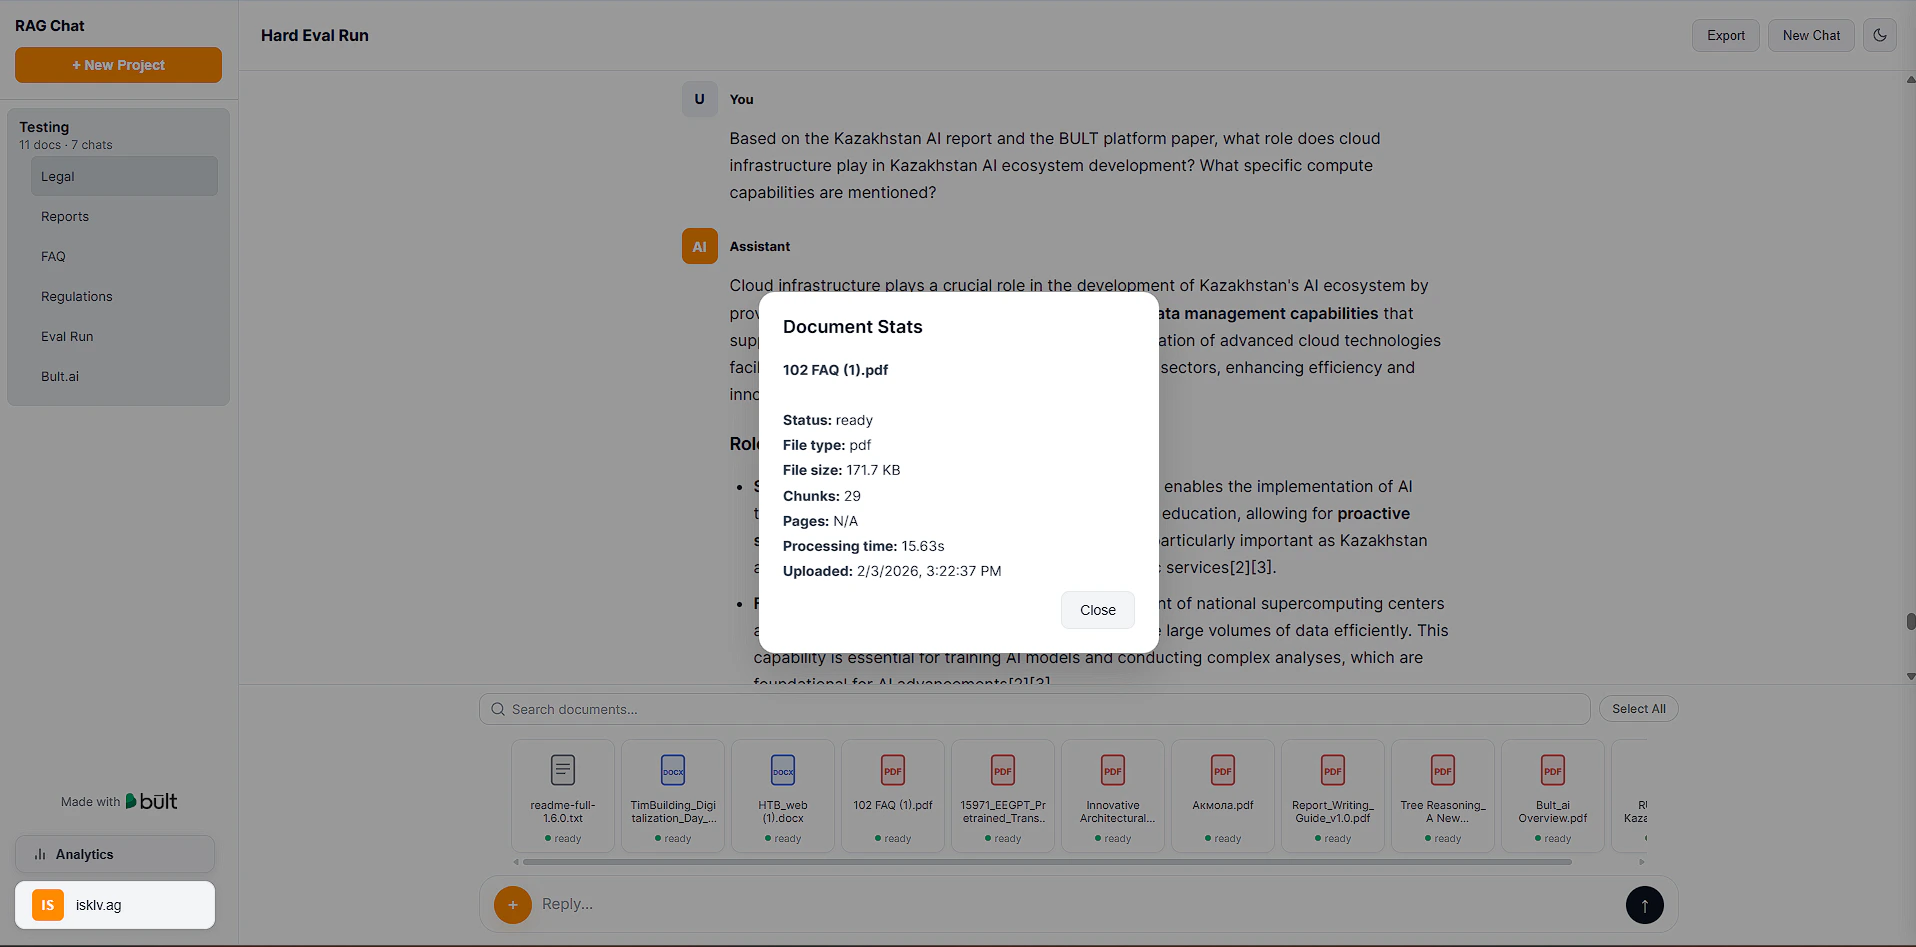
Document stats:
***
### Configuration
All settings are controlled through environment variables. Copy .env.example to .env and adjust as needed.
#### Required
| Variable | Description |
| ---------------- | -------------------------------------------------------------------- |
| PG\_CONN | PostgreSQL connection string (host must match your pgvector service) |
| OPENAI\_API\_KEY | OpenAI API key (used for embeddings and as default LLM) |
| JWT\_SECRET | Random string for signing authentication tokens |
#### LLM provider
| Variable | Default | Description |
| ------------------- | ------------------------------------------------ | --------------------------------------------------- |
| LLM\_PROVIDER | openai | openai, anthropic, google, or ollama |
| LLM\_MODEL | gpt-4o-mini | Model name (e.g., gpt-4o, claude-sonnet-4-20250514) |
| ANTHROPIC\_API\_KEY | - | Required if LLM\_PROVIDER=anthropic |
| GOOGLE\_API\_KEY | - | Required if LLM\_PROVIDER=google |
| OLLAMA\_BASE\_URL | [http://localhost:11434](http://localhost:11434) | Ollama server URL) |
#### RAG tuning
These have sensible defaults and don't need to be set unless you want to experiment:
| Variable | Default | What it does |
| ----------------------- | ------- | ------------------------------------------------------- |
| HYBRID\_SEARCH\_ALPHA | 0.5 | 0 = keyword only, 1 = vector only |
| USE\_RERANKING | true | Cross-encoder reranking for better precision |
| USE\_SEMANTIC\_CHUNKING | true | Chunk at topic boundaries instead of fixed token counts |
| USE\_HYDE | false | Generate hypothetical answer for retrieval |
***
### Project Structure
```text theme={null}
rag-template-multimodel/
|-- app.py # FastAPI entry point, all endpoints, DB bootstrap
|-- core/
| |-- config.py # Environment-driven configuration
| |-- db.py # PostgreSQL connection pool
| |-- auth.py # JWT authentication, user registration/login
| |-- oauth.py # Google OAuth2 integration
| |-- tasks.py # Document processing: load, chunk, embed, OCR
| |-- retrieval.py # RAG pipeline: hybrid search, reranking, HyDE
| |-- export.py # Conversation export (Markdown, JSON, PDF)
| |-- worker.py # Background worker logic
| +-- logging_config.py # Structured logging setup
|-- providers/
| |-- base.py # Abstract LLM/embedding provider interface
| |-- registry.py # Provider auto-detection and registration
| |-- llm_openai.py # OpenAI LLM provider
| |-- llm_anthropic.py # Anthropic LLM provider
| |-- llm_ollama.py # Ollama LLM provider
| +-- embedder_openai.py # OpenAI embedding provider
|-- scripts/
| +-- create_admin.py # Create admin user from CLI
|-- static/
| +-- index.html # Single-page frontend
|-- Dockerfile # Docker image with OCR dependencies
|-- nixpacks.toml # Nixpacks config (used by bult.ai)
|-- requirements.txt # Python dependencies
+-- .env.example # Environment variable template
```
***
### API Reference
All endpoints except /api/health and /api/auth/ require a JWT token in the Authorization: Bearer \ header.
#### Authentication
```text theme={null}
POST /api/auth/register -- Create account (email + password)
POST /api/auth/login -- Get JWT token
GET /api/auth/me -- Get current user info
GET /api/auth/google -- Start Google OAuth flow (if configured)
```
#### Projects & Documents
```text theme={null}
GET /api/projects -- List user's projects
POST /api/projects -- Create project
DELETE /api/projects/{id} -- Delete project and all its data
POST /api/upload -- Upload document to project
DELETE /api/documents/batch -- Delete multiple documents
GET /api/projects/{id}/documents -- List documents in project
```
#### Chat
```text theme={null}
GET /api/projects/{id}/conversations -- List conversations
POST /api/projects/{id}/conversations -- Create conversation
POST /api/chat -- Send message (SSE streaming response)
GET /api/conversations/{id}/export?format=md -- Export conversation (md|json|pdf)
```
#### Analytics
```text theme={null}
GET /api/analytics -- Usage stats, query history, top documents
```
#### System
```text theme={null}
GET /api/health -- Health check (no auth required)
GET /api/jobs/{id}/progress -- Job processing progress
```
***
### Example: Send Chat Message
Request:
`POST /api/chat`
`{\
"project_id": 1,\
"conversation_id": 12,\
"message": "Summarize section 3 of the contract"\
}`
Headers:
Authorization: `Bearer `
Response:\
Server Sent Events stream with incremental tokens.
***
### Customization
#### Change LLM provider
Set LLM\_PROVIDER and the corresponding API key in .env:
```text theme={null}
LLM_PROVIDER=anthropic
ANTHROPIC_API_KEY=sk-ant-your-key
LLM_MODEL=claude-sonnet-4-20250514
```
#### Customize the system prompt
Edit SYSTEM\_PROMPT in core/config.py to change how the LLM responds -- citation style, tone, response structure, etc.
#### Change the UI theme
Edit CSS variables in static/index.html. The UI supports light and dark mode.
***
### Default Retrieval Configuration
* Embedding model: text-embedding-3-large
* Embedding dimension: 3072
* Chunk size: 1024 tokens
* Chunk overlap: 200 tokens
* Top K before reranking: 50
* Top K after reranking: 8
* Hybrid search alpha: 0.5
 \#2
\#2
 ***
### Components
\
**App Service**\
FastAPI backend handling authentication, API endpoints, streaming responses.
**PostgreSQL**\
Stores users, projects, documents, analytics.
**pgvector**\
Stores embeddings and enables vector similarity search.
**Background Worker**\
Processes documents asynchronously:\
• Chunking\
• Embedding generation\
• OCR if needed
**LLM Provider**\
OpenAI, Anthropic, Google, or Ollama.
***
### Features
* Multi-model LLM support -- switch between OpenAI, Anthropic, Google AI, or local Ollama models via environment variable
* Advanced RAG pipeline -- hybrid search (BM25 + vector), cross-encoder reranking, HyDE query transformation, multi-query retrieval, query decomposition
* Document processing -- PDF, DOCX, PPTX, TXT, MD, CSV, JSON, HTML; automatic OCR for scanned PDFs via Tesseract
* Inline citations -- every response cites source documents with relevance scores
* Authentication -- JWT login/register + optional Google OAuth
* Analytics dashboard -- usage metrics, cost tracking, query latency, top projects
* Conversation export -- Markdown, JSON, and PDF export with full Unicode support
* Background processing -- async job queue with progress tracking and retry logic
* Single-page frontend -- clean UI with streaming responses, markdown rendering, dark mode
***
### Deploy RAG on bult.ai
[Bult.ai](https://bult.ai/) is a PaaS that deploys from GitHub with built-in database templates and Docker support.
You need three services: the app (GitHub), a PostgreSQL database, and a pgvector instance.
#### Prerequisites
* GitHub account
* OpenAI API key (get one here)
* [Bult.ai](https://bult.ai/) account
#### Step 1: Fork or clone this repository
Fork this repo on GitHub (or clone it and push to your own repo).
**GitHub repo**: [https://github.com/bultcloud/RAG-BultAI](https://github.com/bultcloud/RAG-BultAI)
#### Step 2: Create the app service (GitHub)
1. On bult.ai, click Create > GitHub
2. Select your forked repository
3. Go to the Git tab and change build settings from Nixpacks to Dockerfile. Set Dockerfile Path to Dockerfile and Dockerfile Context to "."
4. Inside the service settings, set the port to 8002
5. Go to Environment Variables and add the variables from .env.example.
The required ones:
| Variable | Value |
| ---------------- | ----------------------------------------------------------------------------------------- |
| PG\_CONN | postgresql://YOUR\_USER:YOUR\_PASSWORD @pgvector:5432/YOUR\_DB |
| OPENAI\_API\_KEY | Your OpenAI API key |
| JWT\_SECRET | A random string (generate: python -c "import secrets; print(secrets.token\_urlsafe(32))") |
Add any other settings from .env.example as needed (LLM\_MODEL, EMBEDDING\_MODEL, etc.).
Note: The PG\_CONN hostname must match the name of your pgvector Docker service (step 4).
Set the user, password, and database name to match your Postgres service (step 3).
#### Step 3: Create the PostgreSQL database
1. Click Create > in the list of services, go to Databases > Postgres
2. This creates a Postgres instance from a built-in template -- it's automated
3. The only thing you need to configure is the environment variables:
| Variable | Value |
| ------------------ | --------------------------------------- |
| POSTGRES\_USER | Your database username (e.g., pgvector) |
| POSTGRES\_PASSWORD | A strong password |
| POSTGRES\_DB | Your database name (e.g., ragdb) |
These values must match what you put in PG\_CONN in step 2.
#### Step 4: Create the pgvector service (Docker)
The app needs the pgvector extension for vector search. Create a Docker service for it:
1. Click Create > Docker
2. Docker image: ankane/pgvector:latest
3. Name this service to match the hostname in your PG\_CONN (e.g., pgvector)
4. Deploy the service
5. After it's running, add a volume mounted at /var/lib/postgresql/data for persistent storage
6. Add internal port 5432
#### Step 5: Deploy and verify
1. All three services should show as running
***
### Components
\
**App Service**\
FastAPI backend handling authentication, API endpoints, streaming responses.
**PostgreSQL**\
Stores users, projects, documents, analytics.
**pgvector**\
Stores embeddings and enables vector similarity search.
**Background Worker**\
Processes documents asynchronously:\
• Chunking\
• Embedding generation\
• OCR if needed
**LLM Provider**\
OpenAI, Anthropic, Google, or Ollama.
***
### Features
* Multi-model LLM support -- switch between OpenAI, Anthropic, Google AI, or local Ollama models via environment variable
* Advanced RAG pipeline -- hybrid search (BM25 + vector), cross-encoder reranking, HyDE query transformation, multi-query retrieval, query decomposition
* Document processing -- PDF, DOCX, PPTX, TXT, MD, CSV, JSON, HTML; automatic OCR for scanned PDFs via Tesseract
* Inline citations -- every response cites source documents with relevance scores
* Authentication -- JWT login/register + optional Google OAuth
* Analytics dashboard -- usage metrics, cost tracking, query latency, top projects
* Conversation export -- Markdown, JSON, and PDF export with full Unicode support
* Background processing -- async job queue with progress tracking and retry logic
* Single-page frontend -- clean UI with streaming responses, markdown rendering, dark mode
***
### Deploy RAG on bult.ai
[Bult.ai](https://bult.ai/) is a PaaS that deploys from GitHub with built-in database templates and Docker support.
You need three services: the app (GitHub), a PostgreSQL database, and a pgvector instance.
#### Prerequisites
* GitHub account
* OpenAI API key (get one here)
* [Bult.ai](https://bult.ai/) account
#### Step 1: Fork or clone this repository
Fork this repo on GitHub (or clone it and push to your own repo).
**GitHub repo**: [https://github.com/bultcloud/RAG-BultAI](https://github.com/bultcloud/RAG-BultAI)
#### Step 2: Create the app service (GitHub)
1. On bult.ai, click Create > GitHub
2. Select your forked repository
3. Go to the Git tab and change build settings from Nixpacks to Dockerfile. Set Dockerfile Path to Dockerfile and Dockerfile Context to "."
4. Inside the service settings, set the port to 8002
5. Go to Environment Variables and add the variables from .env.example.
The required ones:
| Variable | Value |
| ---------------- | ----------------------------------------------------------------------------------------- |
| PG\_CONN | postgresql://YOUR\_USER:YOUR\_PASSWORD @pgvector:5432/YOUR\_DB |
| OPENAI\_API\_KEY | Your OpenAI API key |
| JWT\_SECRET | A random string (generate: python -c "import secrets; print(secrets.token\_urlsafe(32))") |
Add any other settings from .env.example as needed (LLM\_MODEL, EMBEDDING\_MODEL, etc.).
Note: The PG\_CONN hostname must match the name of your pgvector Docker service (step 4).
Set the user, password, and database name to match your Postgres service (step 3).
#### Step 3: Create the PostgreSQL database
1. Click Create > in the list of services, go to Databases > Postgres
2. This creates a Postgres instance from a built-in template -- it's automated
3. The only thing you need to configure is the environment variables:
| Variable | Value |
| ------------------ | --------------------------------------- |
| POSTGRES\_USER | Your database username (e.g., pgvector) |
| POSTGRES\_PASSWORD | A strong password |
| POSTGRES\_DB | Your database name (e.g., ragdb) |
These values must match what you put in PG\_CONN in step 2.
#### Step 4: Create the pgvector service (Docker)
The app needs the pgvector extension for vector search. Create a Docker service for it:
1. Click Create > Docker
2. Docker image: ankane/pgvector:latest
3. Name this service to match the hostname in your PG\_CONN (e.g., pgvector)
4. Deploy the service
5. After it's running, add a volume mounted at /var/lib/postgresql/data for persistent storage
6. Add internal port 5432
#### Step 5: Deploy and verify
1. All three services should show as running
 2. Check the app service logs -- you should see database migrations and the worker starting
3. Open the public URL for your app service. Register a user and start chatting.
#### Troubleshooting
| Problem | Fix |
| --------------------------- | --------------------------------------------------------------------------------------------------------------------------------------------------- |
| Database connection error | Verify PG\_CONN hostname matches your pgvector service name. Check that POSTGRES\_USER, POSTGRES\_PASSWORD, and POSTGRES\_DB match across services. |
| Documents stuck in "queued" | Check app logs for errors. Verify OPENAI\_API\_KEY is set correctly. |
| OCR not working | Nixpacks installs Tesseract automatically from nixpacks.toml. Check build logs. |
| Build fails | Make sure your fork is up to date. Check build logs on bult.ai. |
#### Optional: Google Sign-In
To enable Google OAuth login:
1. Go to Google Cloud Console and create a project (or use an existing one)
2. Navigate to APIs & Services > OAuth Consent Screen and configure it
3. Go to Credentials > Create OAuth Client ID > Web Application
4. Under Authorized redirect URIs, add your bult.ai callback URL. The format is:
```text theme={null}
https://
2. Check the app service logs -- you should see database migrations and the worker starting
3. Open the public URL for your app service. Register a user and start chatting.
#### Troubleshooting
| Problem | Fix |
| --------------------------- | --------------------------------------------------------------------------------------------------------------------------------------------------- |
| Database connection error | Verify PG\_CONN hostname matches your pgvector service name. Check that POSTGRES\_USER, POSTGRES\_PASSWORD, and POSTGRES\_DB match across services. |
| Documents stuck in "queued" | Check app logs for errors. Verify OPENAI\_API\_KEY is set correctly. |
| OCR not working | Nixpacks installs Tesseract automatically from nixpacks.toml. Check build logs. |
| Build fails | Make sure your fork is up to date. Check build logs on bult.ai. |
#### Optional: Google Sign-In
To enable Google OAuth login:
1. Go to Google Cloud Console and create a project (or use an existing one)
2. Navigate to APIs & Services > OAuth Consent Screen and configure it
3. Go to Credentials > Create OAuth Client ID > Web Application
4. Under Authorized redirect URIs, add your bult.ai callback URL. The format is:
```text theme={null}
https://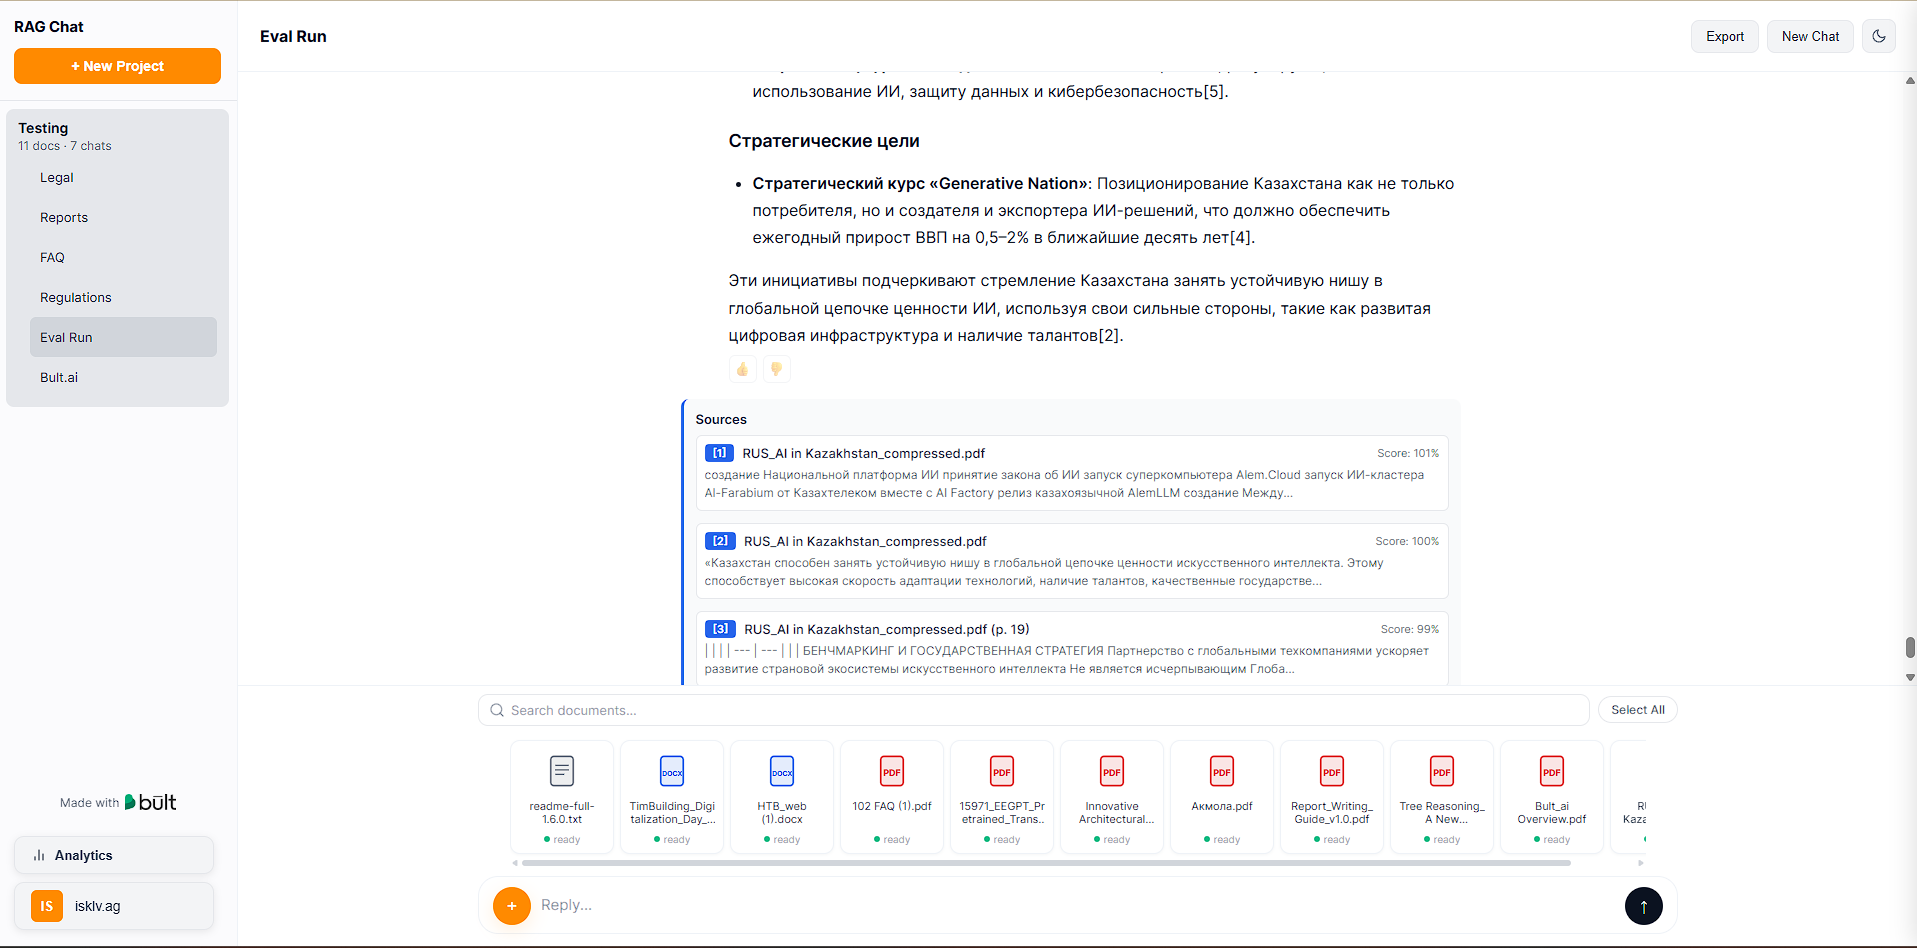 Document stats:
 ***
### Configuration
All settings are controlled through environment variables. Copy .env.example to .env and adjust as needed.
#### Required
| Variable | Description |
| ---------------- | -------------------------------------------------------------------- |
| PG\_CONN | PostgreSQL connection string (host must match your pgvector service) |
| OPENAI\_API\_KEY | OpenAI API key (used for embeddings and as default LLM) |
| JWT\_SECRET | Random string for signing authentication tokens |
#### LLM provider
| Variable | Default | Description |
| ------------------- | ------------------------------------------------ | --------------------------------------------------- |
| LLM\_PROVIDER | openai | openai, anthropic, google, or ollama |
| LLM\_MODEL | gpt-4o-mini | Model name (e.g., gpt-4o, claude-sonnet-4-20250514) |
| ANTHROPIC\_API\_KEY | - | Required if LLM\_PROVIDER=anthropic |
| GOOGLE\_API\_KEY | - | Required if LLM\_PROVIDER=google |
| OLLAMA\_BASE\_URL | [http://localhost:11434](http://localhost:11434) | Ollama server URL) |
#### RAG tuning
These have sensible defaults and don't need to be set unless you want to experiment:
| Variable | Default | What it does |
| ----------------------- | ------- | ------------------------------------------------------- |
| HYBRID\_SEARCH\_ALPHA | 0.5 | 0 = keyword only, 1 = vector only |
| USE\_RERANKING | true | Cross-encoder reranking for better precision |
| USE\_SEMANTIC\_CHUNKING | true | Chunk at topic boundaries instead of fixed token counts |
| USE\_HYDE | false | Generate hypothetical answer for retrieval |
***
### Project Structure
```text theme={null}
rag-template-multimodel/
|-- app.py # FastAPI entry point, all endpoints, DB bootstrap
|-- core/
| |-- config.py # Environment-driven configuration
| |-- db.py # PostgreSQL connection pool
| |-- auth.py # JWT authentication, user registration/login
| |-- oauth.py # Google OAuth2 integration
| |-- tasks.py # Document processing: load, chunk, embed, OCR
| |-- retrieval.py # RAG pipeline: hybrid search, reranking, HyDE
| |-- export.py # Conversation export (Markdown, JSON, PDF)
| |-- worker.py # Background worker logic
| +-- logging_config.py # Structured logging setup
|-- providers/
| |-- base.py # Abstract LLM/embedding provider interface
| |-- registry.py # Provider auto-detection and registration
| |-- llm_openai.py # OpenAI LLM provider
| |-- llm_anthropic.py # Anthropic LLM provider
| |-- llm_ollama.py # Ollama LLM provider
| +-- embedder_openai.py # OpenAI embedding provider
|-- scripts/
| +-- create_admin.py # Create admin user from CLI
|-- static/
| +-- index.html # Single-page frontend
|-- Dockerfile # Docker image with OCR dependencies
|-- nixpacks.toml # Nixpacks config (used by bult.ai)
|-- requirements.txt # Python dependencies
+-- .env.example # Environment variable template
```
***
### API Reference
All endpoints except /api/health and /api/auth/ require a JWT token in the Authorization: Bearer \
***
### Configuration
All settings are controlled through environment variables. Copy .env.example to .env and adjust as needed.
#### Required
| Variable | Description |
| ---------------- | -------------------------------------------------------------------- |
| PG\_CONN | PostgreSQL connection string (host must match your pgvector service) |
| OPENAI\_API\_KEY | OpenAI API key (used for embeddings and as default LLM) |
| JWT\_SECRET | Random string for signing authentication tokens |
#### LLM provider
| Variable | Default | Description |
| ------------------- | ------------------------------------------------ | --------------------------------------------------- |
| LLM\_PROVIDER | openai | openai, anthropic, google, or ollama |
| LLM\_MODEL | gpt-4o-mini | Model name (e.g., gpt-4o, claude-sonnet-4-20250514) |
| ANTHROPIC\_API\_KEY | - | Required if LLM\_PROVIDER=anthropic |
| GOOGLE\_API\_KEY | - | Required if LLM\_PROVIDER=google |
| OLLAMA\_BASE\_URL | [http://localhost:11434](http://localhost:11434) | Ollama server URL) |
#### RAG tuning
These have sensible defaults and don't need to be set unless you want to experiment:
| Variable | Default | What it does |
| ----------------------- | ------- | ------------------------------------------------------- |
| HYBRID\_SEARCH\_ALPHA | 0.5 | 0 = keyword only, 1 = vector only |
| USE\_RERANKING | true | Cross-encoder reranking for better precision |
| USE\_SEMANTIC\_CHUNKING | true | Chunk at topic boundaries instead of fixed token counts |
| USE\_HYDE | false | Generate hypothetical answer for retrieval |
***
### Project Structure
```text theme={null}
rag-template-multimodel/
|-- app.py # FastAPI entry point, all endpoints, DB bootstrap
|-- core/
| |-- config.py # Environment-driven configuration
| |-- db.py # PostgreSQL connection pool
| |-- auth.py # JWT authentication, user registration/login
| |-- oauth.py # Google OAuth2 integration
| |-- tasks.py # Document processing: load, chunk, embed, OCR
| |-- retrieval.py # RAG pipeline: hybrid search, reranking, HyDE
| |-- export.py # Conversation export (Markdown, JSON, PDF)
| |-- worker.py # Background worker logic
| +-- logging_config.py # Structured logging setup
|-- providers/
| |-- base.py # Abstract LLM/embedding provider interface
| |-- registry.py # Provider auto-detection and registration
| |-- llm_openai.py # OpenAI LLM provider
| |-- llm_anthropic.py # Anthropic LLM provider
| |-- llm_ollama.py # Ollama LLM provider
| +-- embedder_openai.py # OpenAI embedding provider
|-- scripts/
| +-- create_admin.py # Create admin user from CLI
|-- static/
| +-- index.html # Single-page frontend
|-- Dockerfile # Docker image with OCR dependencies
|-- nixpacks.toml # Nixpacks config (used by bult.ai)
|-- requirements.txt # Python dependencies
+-- .env.example # Environment variable template
```
***
### API Reference
All endpoints except /api/health and /api/auth/ require a JWT token in the Authorization: Bearer \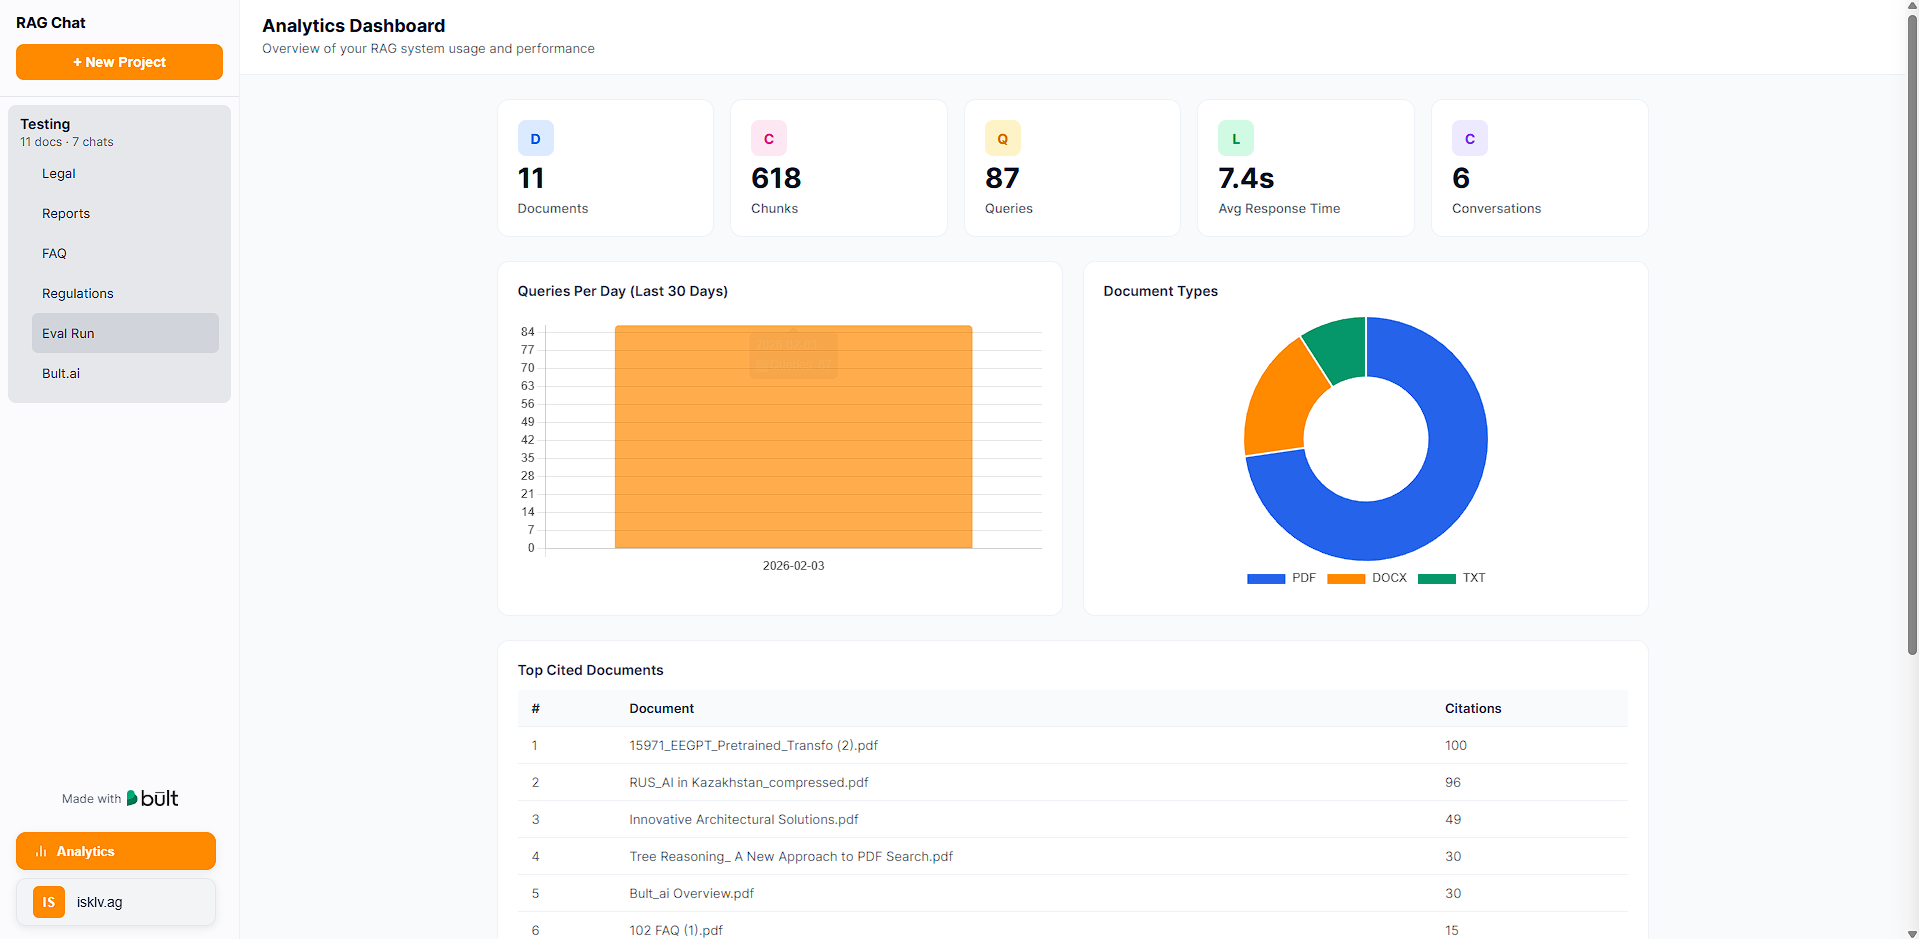 #### System
```text theme={null}
GET /api/health -- Health check (no auth required)
GET /api/jobs/{id}/progress -- Job processing progress
```
***
### Example: Send Chat Message
Request:
`POST /api/chat`
`{\
"project_id": 1,\
"conversation_id": 12,\
"message": "Summarize section 3 of the contract"\
}`
Headers:
Authorization: `Bearer
#### System
```text theme={null}
GET /api/health -- Health check (no auth required)
GET /api/jobs/{id}/progress -- Job processing progress
```
***
### Example: Send Chat Message
Request:
`POST /api/chat`
`{\
"project_id": 1,\
"conversation_id": 12,\
"message": "Summarize section 3 of the contract"\
}`
Headers:
Authorization: `Bearer