Overview
Automation tools like n8n make it easy to connect apps and AI models into a single assistant that manages your daily work. Combined with Bult.ai, you can deploy n8n in minutes, link it to Telegram, Gmail, Google Tasks, Google Contacts, and Calendar, and have your own personal AI secretary running in the cloud. This updated guide uses the official Bult.ai n8n workflow repository instead of the older template library, giving you more features and better defaults.Step 1: Deploy n8n on Bult.ai
- Sign up at bult.ai.
- Go to your dashboard → click New Project.
- Give it a name and open the project.
- Click Create, then go to Templates → n8n.
- Click Apply, then Deploy.
- Once deployed, you’ll see a public link like: https://your-project-name.fin1.bult.app/
- Follow that link, sign up for n8n, click Send activation link, check your email, copy the code, go to Plan & Usage, and paste it.
Step 2: Import the Workflow
You can start from scratch or import a ready-made workflow. You can find many Workflow Templates here.- In this example I will use Personal Telegram Assistant Bot from this GitHub repo. Open the repository and copy the contents of bult-assistant.json.
- In your n8n, click Create Workflow and paste the template (Ctrl+V).
If you send text, it goes straight to ChatGPT.
If you send voice, it’s transcribed to text first.
The AI model decides whether to check Gmail, Google Tasks, Google Contacts, or Calendar — then replies to you directly on Telegram.
Step 3: Connect Telegram
Now we need to set up credentials.- Open Telegram and search for @BotFather.
- Send
/startand then/newbotand follow the setup. - Copy the API token BotFather gives you.
- In n8n, open the Telegram Trigger node and paste the token into a new Telegram credential.
Step 4: Connect Google Services
- In n8n, open a Gmail node and create a new credential.
- Copy the Redirect URI shown in n8n (it will look like your Bult URL +
/rest/oauth2-credential/callback). - Go to Google Cloud Console.
• Create a new project.
• Go to APIs & Services → OAuth Consent Screen and fill the required info.
• Click Create OAuth Client ID → choose Web Application.
• Go to Credentials → copy the Client ID and Client Secret, then paste them into n8n.
• Click Connect, sign in with Google, and approve. - Go to Clients, pick your Client ID. Copy and paste Client ID and Client Secret from Google Cloud to N8N.
- Click Connect, sign in with your Google account, and approve the permissions. Repeat the same for Google Calendar, Google Tasks and Google Contacts (Google People API).
- In Google Cloud, type Gmail, Calendar, Tasks and Google People in the search bar and enable their APIs.
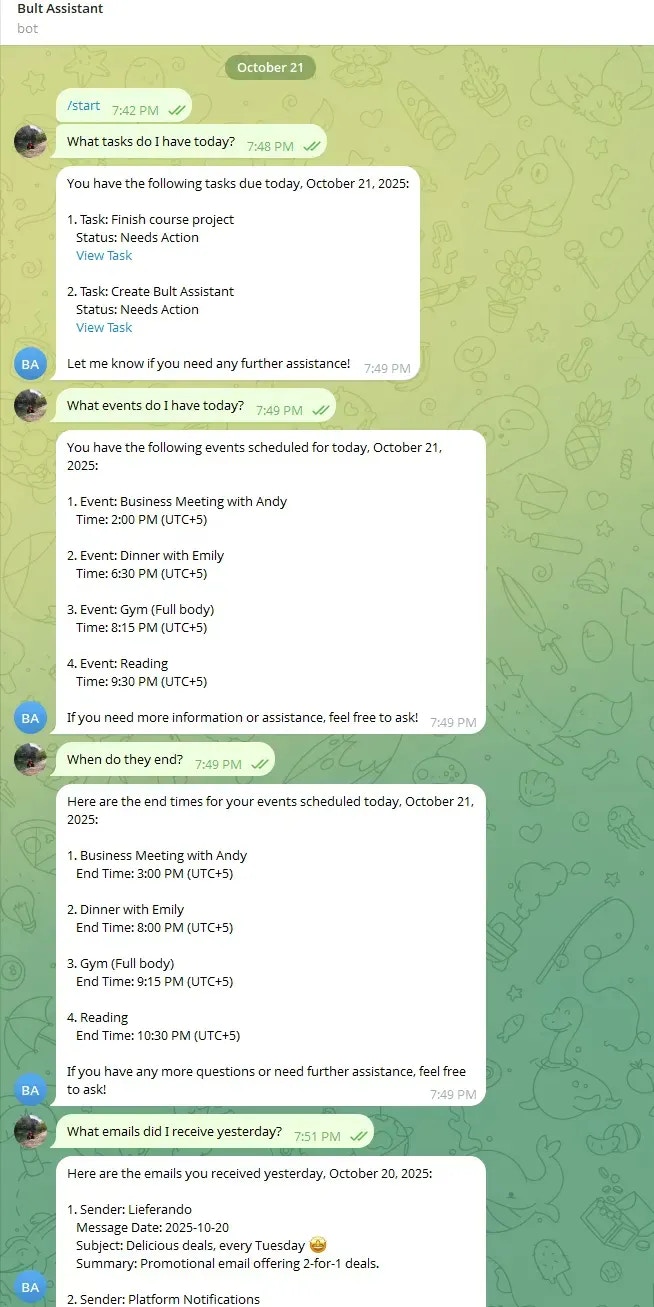
Step 5: Test the bot (text and voice)
Open your Telegram bot → tap Start. In n8n click Execute Workflow (for testing). Send a message:- Text: “What tasks do I have today?”, “What events do I have today?”, “When do they end?”, “What emails did I receive yesterday?”
- Voice: speak the same prompts; the flow transcribes, routes to Gmail/Tasks/Contacts/Calendar, and replies.