Overview
Deploy a production ready Retrieval Augmented Generation (RAG) system in minutes.
Full step-by-step video tutorial is here: https://youtu.be/CkcVGtiSGDQ?si=Y1X1LP-Aw09g_zIp
GitHub repo: https://github.com/bultcloud/RAG-BultAI
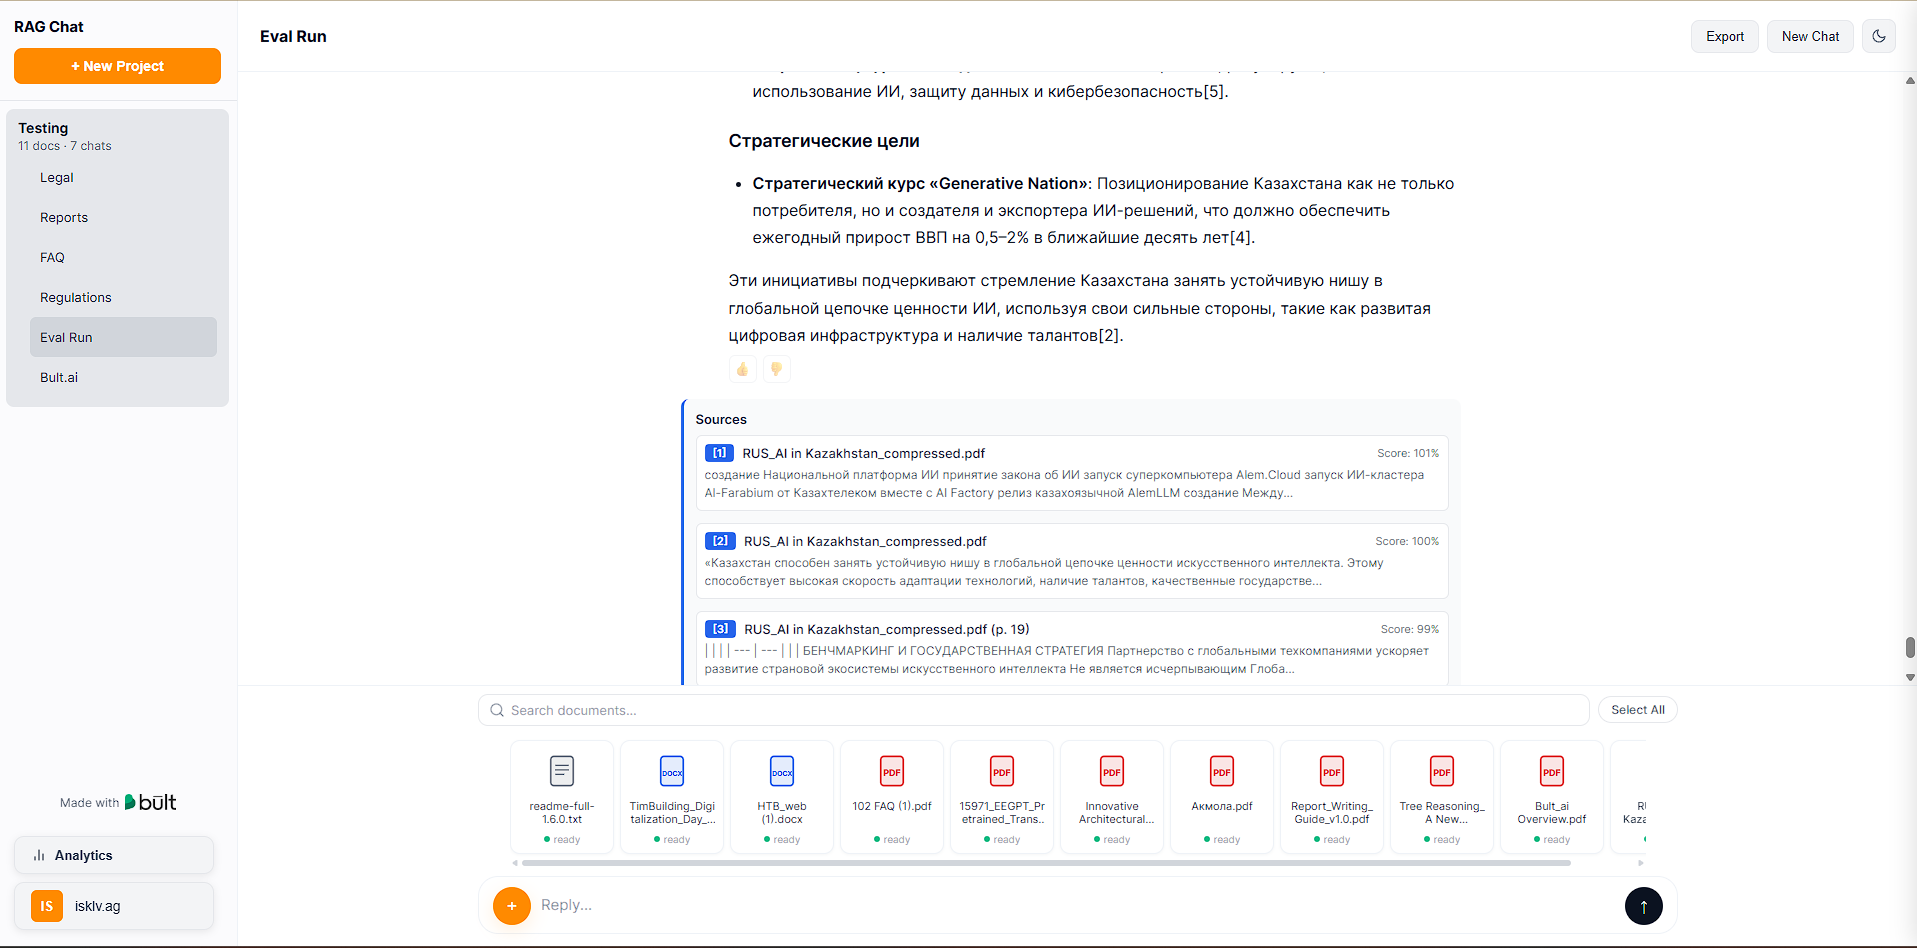
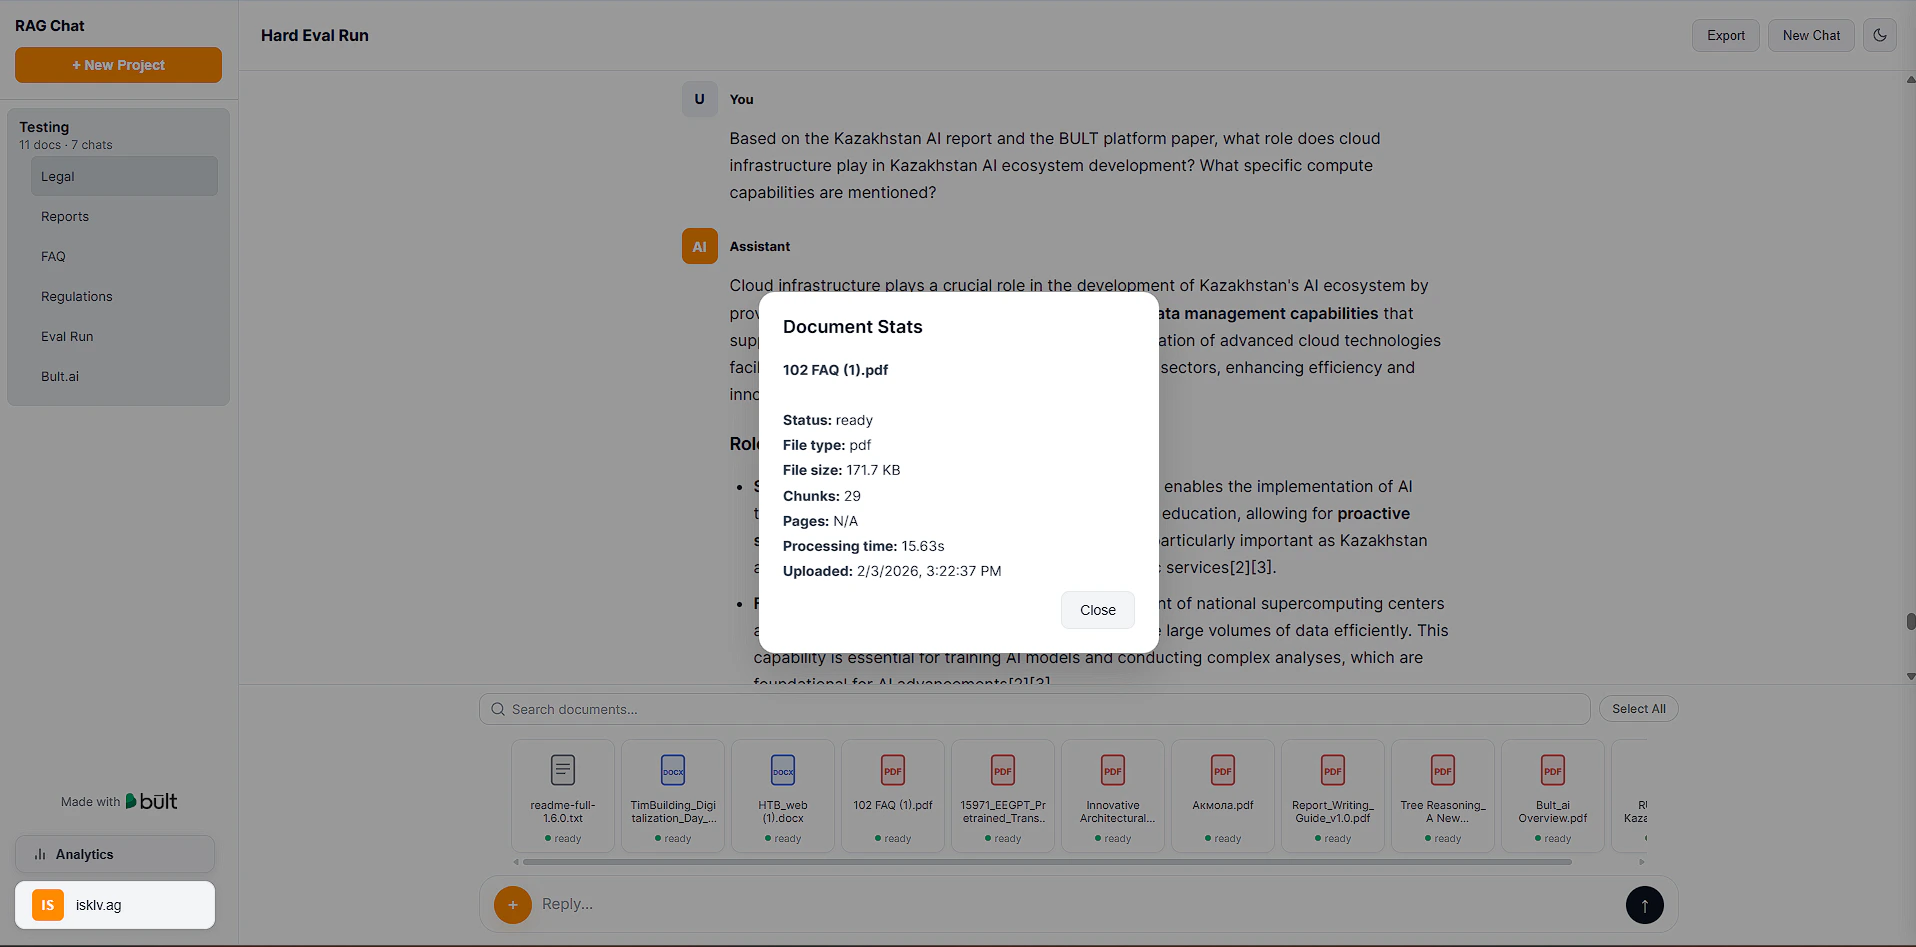
Upload documents. Ask questions. Get answers with inline citations and source scoring.
This template includes:
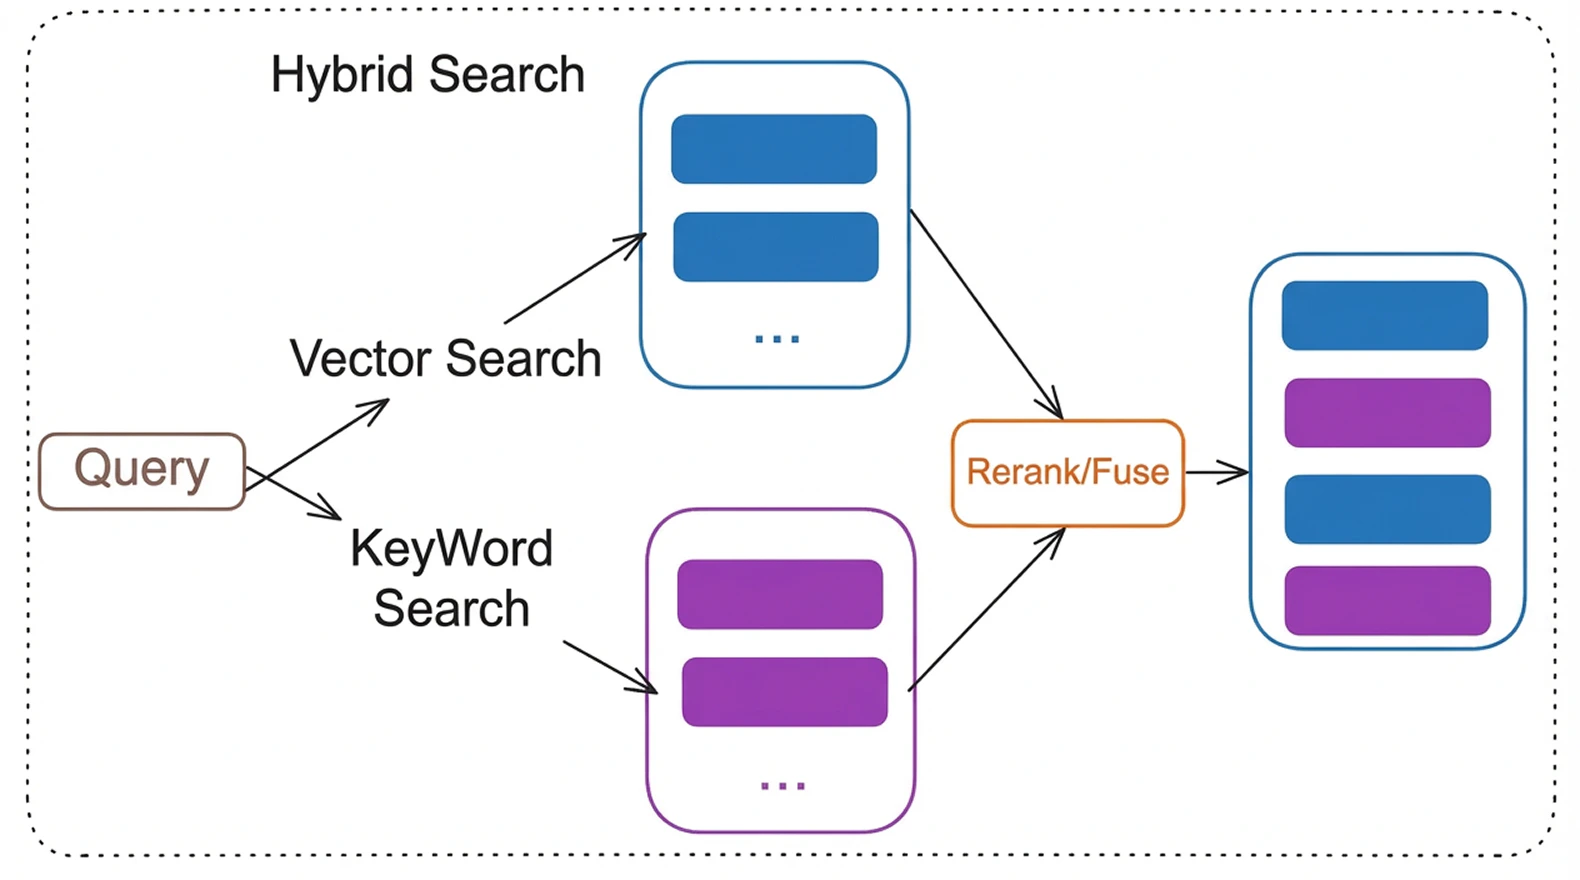
• Hybrid search combining keyword and vector retrieval
• Cross encoder reranking for higher precision
• Multi model LLM support
• Background document processing
• Authentication and analytics It supports multiple LLM providers (OpenAI, Anthropic, Google, Ollama), hybrid search with reranking, OCR for scanned PDFs, multi-user authentication, and conversation export. It is designed to demonstrate how to run serious AI workloads on Bult.ai without managing infrastructure.
Architecture
#1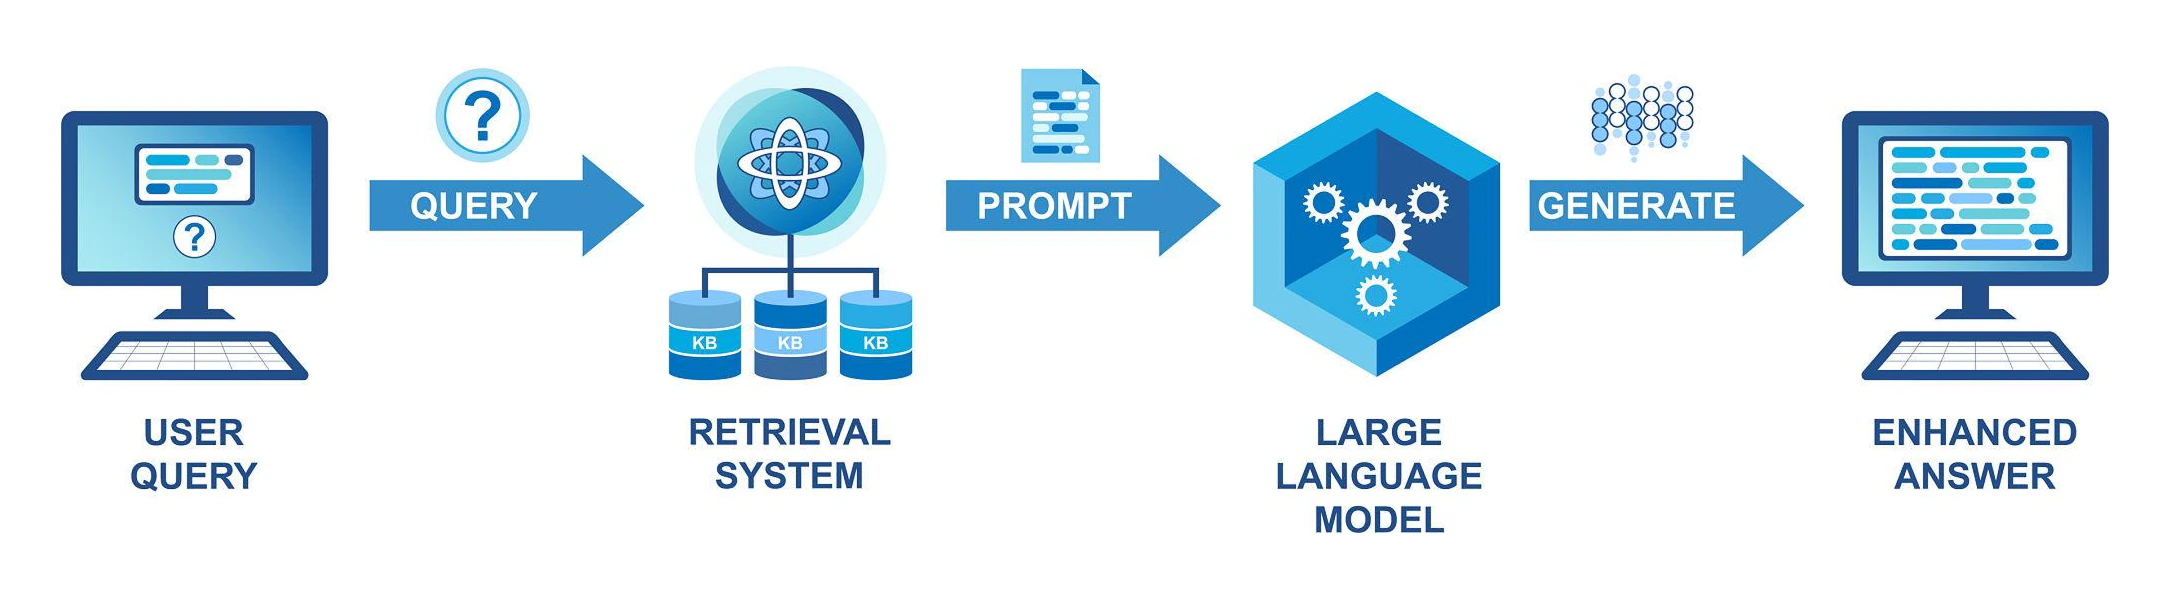
Components
App Service
FastAPI backend handling authentication, API endpoints, streaming responses. PostgreSQL
Stores users, projects, documents, analytics. pgvector
Stores embeddings and enables vector similarity search. Background Worker
Processes documents asynchronously:
• Chunking
• Embedding generation
• OCR if needed LLM Provider
OpenAI, Anthropic, Google, or Ollama.
Features
- Multi-model LLM support — switch between OpenAI, Anthropic, Google AI, or local Ollama models via environment variable
- Advanced RAG pipeline — hybrid search (BM25 + vector), cross-encoder reranking, HyDE query transformation, multi-query retrieval, query decomposition
- Document processing — PDF, DOCX, PPTX, TXT, MD, CSV, JSON, HTML; automatic OCR for scanned PDFs via Tesseract
- Inline citations — every response cites source documents with relevance scores
- Authentication — JWT login/register + optional Google OAuth
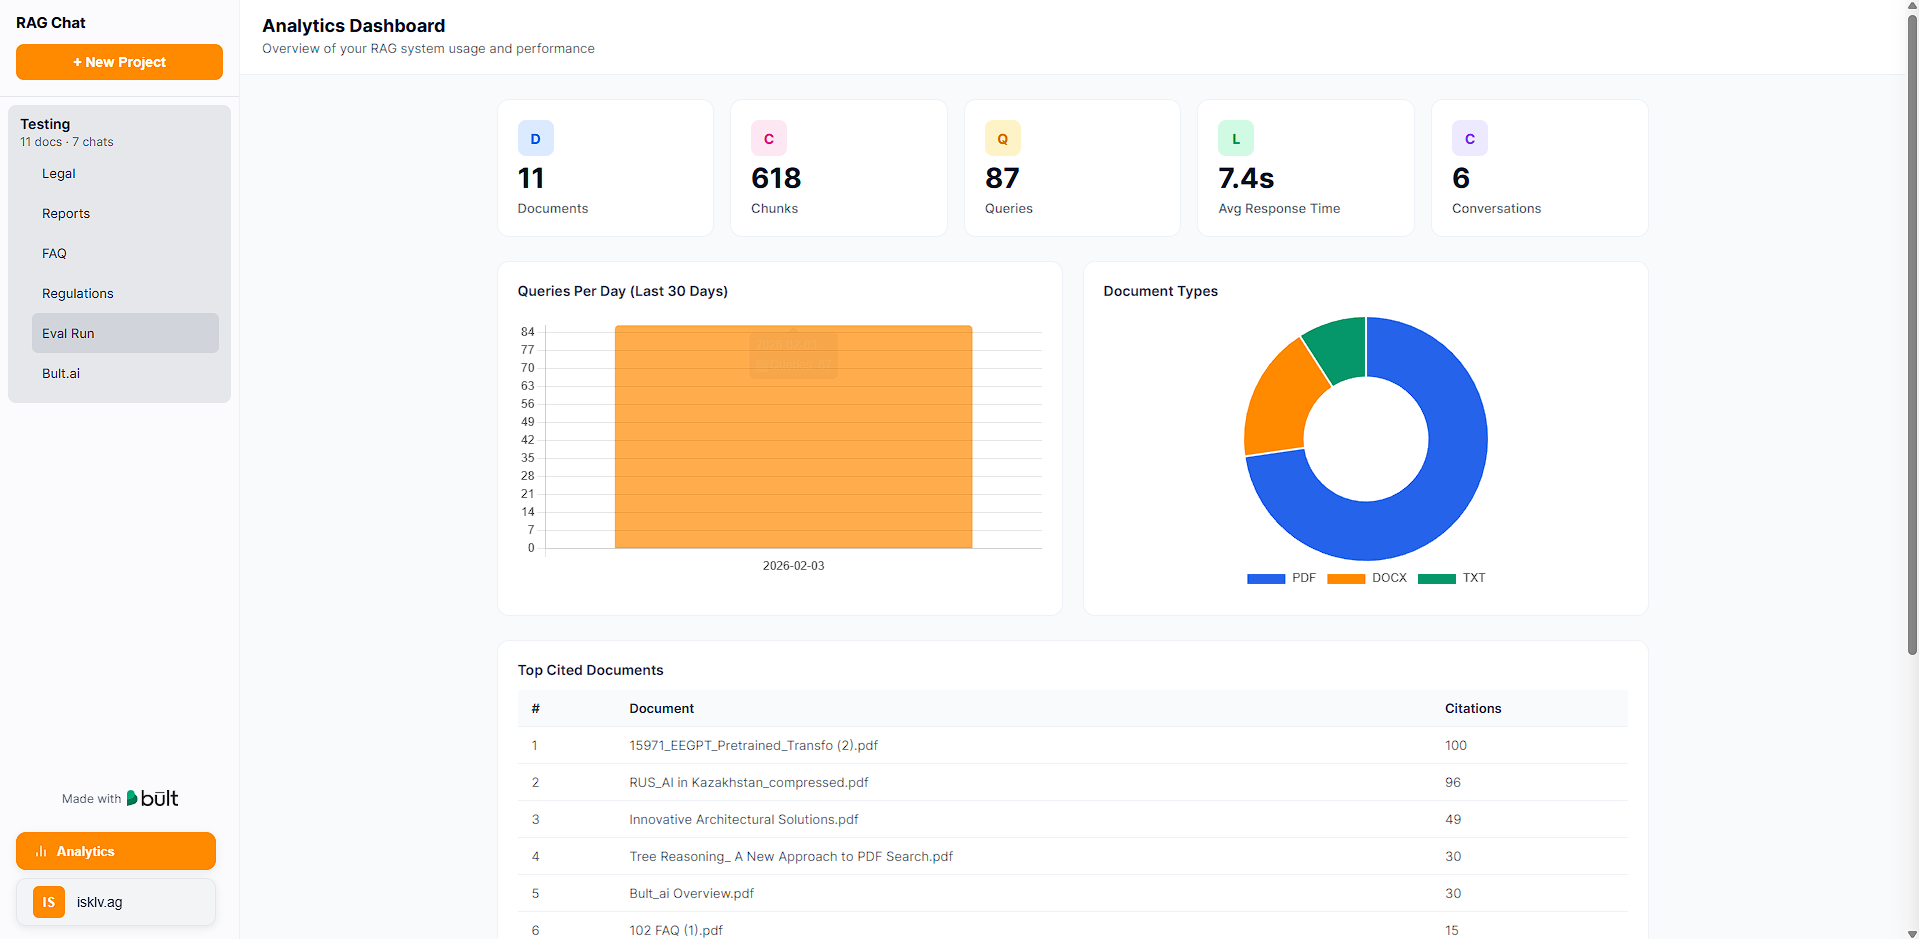
- Analytics dashboard — usage metrics, cost tracking, query latency, top projects
- Conversation export — Markdown, JSON, and PDF export with full Unicode support
- Background processing — async job queue with progress tracking and retry logic
- Single-page frontend — clean UI with streaming responses, markdown rendering, dark mode
Deploy RAG on bult.ai
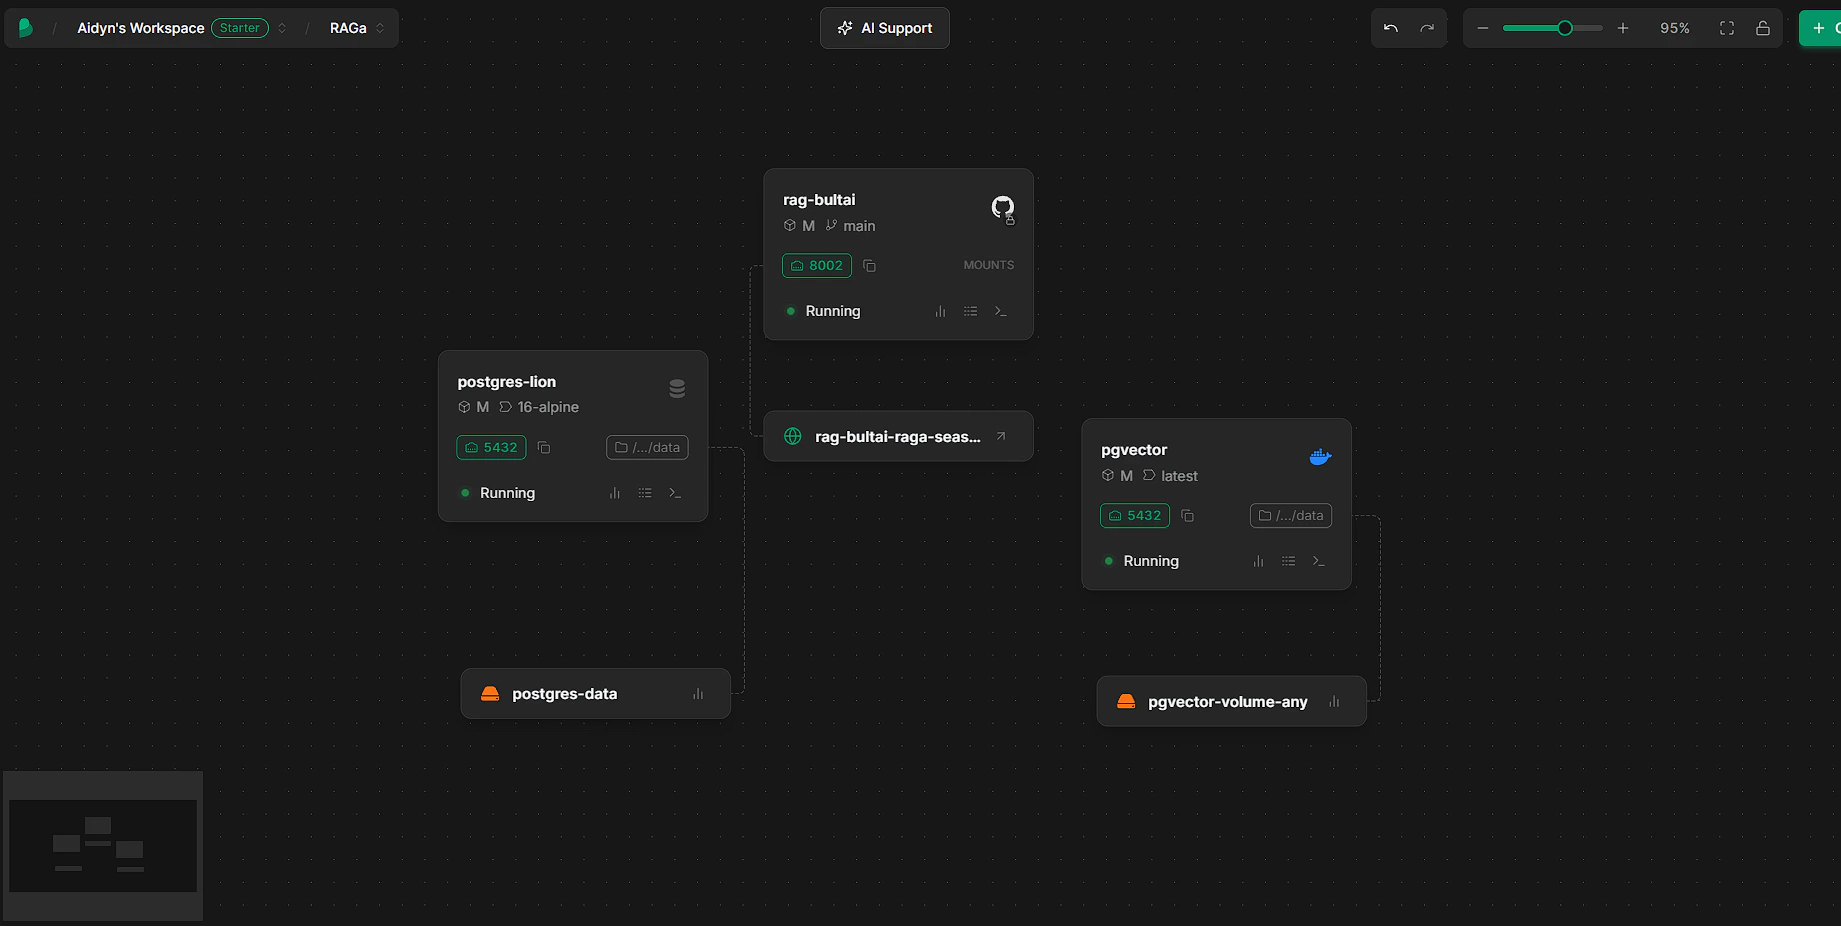
Bult.ai is a PaaS that deploys from GitHub with built-in database templates and Docker support. You need three services: the app (GitHub), a PostgreSQL database, and a pgvector instance.Prerequisites
- GitHub account
- OpenAI API key (get one here)
- Bult.ai account
Step 1: Fork or clone this repository
Fork this repo on GitHub (or clone it and push to your own repo). GitHub repo: https://github.com/bultcloud/RAG-BultAIStep 2: Create the app service (GitHub)
- On bult.ai, click Create > GitHub
- Select your forked repository
- Go to the Git tab and change build settings from Nixpacks to Dockerfile. Set Dockerfile Path to Dockerfile and Dockerfile Context to ”.”
- Inside the service settings, set the port to 8002
- Go to Environment Variables and add the variables from .env.example.
| Variable | Value |
|---|---|
| PG_CONN | postgresql://YOUR_USER:YOUR_PASSWORD @pgvector:5432/YOUR_DB |
| OPENAI_API_KEY | Your OpenAI API key |
| JWT_SECRET | A random string (generate: python -c “import secrets; print(secrets.token_urlsafe(32))”) |
Step 3: Create the PostgreSQL database
- Click Create > in the list of services, go to Databases > Postgres
- This creates a Postgres instance from a built-in template — it’s automated
- The only thing you need to configure is the environment variables:
| Variable | Value |
|---|---|
| POSTGRES_USER | Your database username (e.g., pgvector) |
| POSTGRES_PASSWORD | A strong password |
| POSTGRES_DB | Your database name (e.g., ragdb) |
Step 4: Create the pgvector service (Docker)
The app needs the pgvector extension for vector search. Create a Docker service for it:- Click Create > Docker
- Docker image: ankane/pgvector:latest
- Name this service to match the hostname in your PG_CONN (e.g., pgvector)
- Deploy the service
- After it’s running, add a volume mounted at /var/lib/postgresql/data for persistent storage
- Add internal port 5432
Step 5: Deploy and verify
- All three services should show as running
- Check the app service logs — you should see database migrations and the worker starting
- Open the public URL for your app service. Register a user and start chatting.
Troubleshooting
| Problem | Fix |
|---|---|
| Database connection error | Verify PG_CONN hostname matches your pgvector service name. Check that POSTGRES_USER, POSTGRES_PASSWORD, and POSTGRES_DB match across services. |
| Documents stuck in “queued” | Check app logs for errors. Verify OPENAI_API_KEY is set correctly. |
| OCR not working | Nixpacks installs Tesseract automatically from nixpacks.toml. Check build logs. |
| Build fails | Make sure your fork is up to date. Check build logs on bult.ai. |
Optional: Google Sign-In
To enable Google OAuth login:- Go to Google Cloud Console and create a project (or use an existing one)
- Navigate to APIs & Services > OAuth Consent Screen and configure it
- Go to Credentials > Create OAuth Client ID > Web Application
- Under Authorized redirect URIs, add your bult.ai callback URL. The format is:
- Copy the Client ID and Client Secret, then add these environment variables to your app service:
| Variable | Value |
|---|---|
| GOOGLE_CLIENT_ID | Your OAuth client ID |
| GOOGLE_CLIENT_SECRET | Your OAuth client secret |
| OAUTH_REDIRECT_URI | https://<your-project>.<region>.bult.app/api/auth/google/callback |
- Redeploy. The login page will show a “Sign in with Google” button.
Local Development
Prerequisites
- Python 3.10+
- PostgreSQL 14+ with pgvector extension
- OpenAI API key
Setup
How It Works
Document processing pipeline
- User uploads a file through the web UI
- A background job is created (status: queued)
- The worker picks up the job and processes the document:
- Loads the file with PyMuPDF (PDFs) or LlamaIndex readers (other formats)
- Detects if the PDF has a text layer — if not, runs OCR (Tesseract)
- Optionally extracts tables with pdfplumber
- Splits text into chunks (semantic or fixed-size, configurable)
- Generates embeddings via OpenAI API
- Stores chunks + embeddings in PostgreSQL with pgvector
- Document status updates in real time: queued > processing > ready
Query pipeline
- User asks a question in a conversation
- The query goes through optional transformations: HyDE, multi-query expansion, decomposition
- Hybrid search combines BM25 keyword matching + vector similarity (configurable alpha balance)
- Cross-encoder reranks the top candidates for precision
- Top chunks are sent to the LLM with a system prompt that enforces inline citations
- Response streams back to the UI character by character
Configuration
All settings are controlled through environment variables. Copy .env.example to .env and adjust as needed.Required
| Variable | Description |
|---|---|
| PG_CONN | PostgreSQL connection string (host must match your pgvector service) |
| OPENAI_API_KEY | OpenAI API key (used for embeddings and as default LLM) |
| JWT_SECRET | Random string for signing authentication tokens |
LLM provider
| Variable | Default | Description |
|---|---|---|
| LLM_PROVIDER | openai | openai, anthropic, google, or ollama |
| LLM_MODEL | gpt-4o-mini | Model name (e.g., gpt-4o, claude-sonnet-4-20250514) |
| ANTHROPIC_API_KEY | - | Required if LLM_PROVIDER=anthropic |
| GOOGLE_API_KEY | - | Required if LLM_PROVIDER=google |
| OLLAMA_BASE_URL | http://localhost:11434 | Ollama server URL) |
RAG tuning
These have sensible defaults and don’t need to be set unless you want to experiment:| Variable | Default | What it does |
|---|---|---|
| HYBRID_SEARCH_ALPHA | 0.5 | 0 = keyword only, 1 = vector only |
| USE_RERANKING | true | Cross-encoder reranking for better precision |
| USE_SEMANTIC_CHUNKING | true | Chunk at topic boundaries instead of fixed token counts |
| USE_HYDE | false | Generate hypothetical answer for retrieval |
Project Structure
API Reference
All endpoints except /api/health and /api/auth/ require a JWT token in the Authorization: Bearer <token> header.Authentication
Projects & Documents
Chat
Analytics
System
Example: Send Chat Message
Request:POST /api/chat
{\ "project_id": 1,\ "conversation_id": 12,\ "message": "Summarize section 3 of the contract"\ }
Headers:
Authorization: Bearer <your_jwt_token>
Response:Server Sent Events stream with incremental tokens.
Customization
Change LLM provider
Set LLM_PROVIDER and the corresponding API key in .env:Customize the system prompt
Edit SYSTEM_PROMPT in core/config.py to change how the LLM responds — citation style, tone, response structure, etc.Change the UI theme
Edit CSS variables in static/index.html. The UI supports light and dark mode.Default Retrieval Configuration
- Embedding model: text-embedding-3-large
- Embedding dimension: 3072
- Chunk size: 1024 tokens
- Chunk overlap: 200 tokens
- Top K before reranking: 50
- Top K after reranking: 8
- Hybrid search alpha: 0.5